
Editing & Customizing Optic Lens Flare Presets
The core of the Optic Lens Flares system are two main Blueprints: BP_SunFlare for dominant light sources like the sun, and the versatile BP_UniversalFlare for all other lights. These Blueprints are located in the OpticFlares/Blueprints/ folder. This guide will show you how to edit the included presets and save your own unique variations.
Part 1: Editing an Existing Preset
This section explains how to modify a pre-built preset. We'll use the "Genre - Retro Sci-Fi" preset as our example.
Important Note: Modifying an existing preset will permanently save changes to the original file. This will affect the preset in all other levels and projects. For a non-destructive workflow, see Part 2.
Step 1: Set Up Your Scene
1. In the Content Drawer, navigate to OpticFlares/Blueprints/ and drag a BP_UniversalFlare into your level.
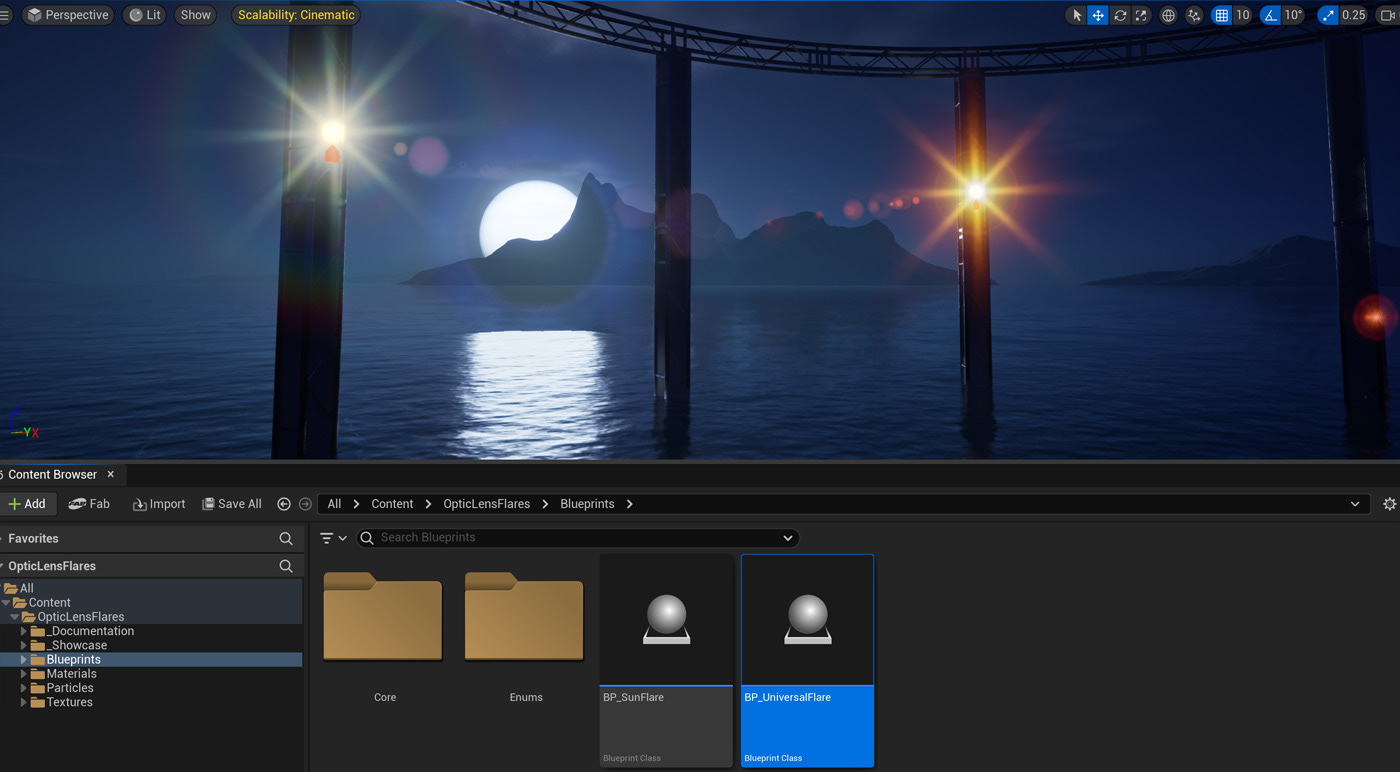
Dragging and dropping a lens flare blueprint from the Content Browser into a level
2. With the Blueprint selected, locate the Details Panel.
3. Under the category A. Presets, select "Genre - Retro Sci-Fi" from the Flare Style drop-down menu.

Blueprint's Details panel with the "A. Presets" tab and the "Genre - Retro Sci-Fi" preset selected
Step 2: Tweak Global Blueprint Parameters
The Blueprint provides high-level controls for quick, broad adjustments. These settings are found in the Details Panel within clearly marked categories:
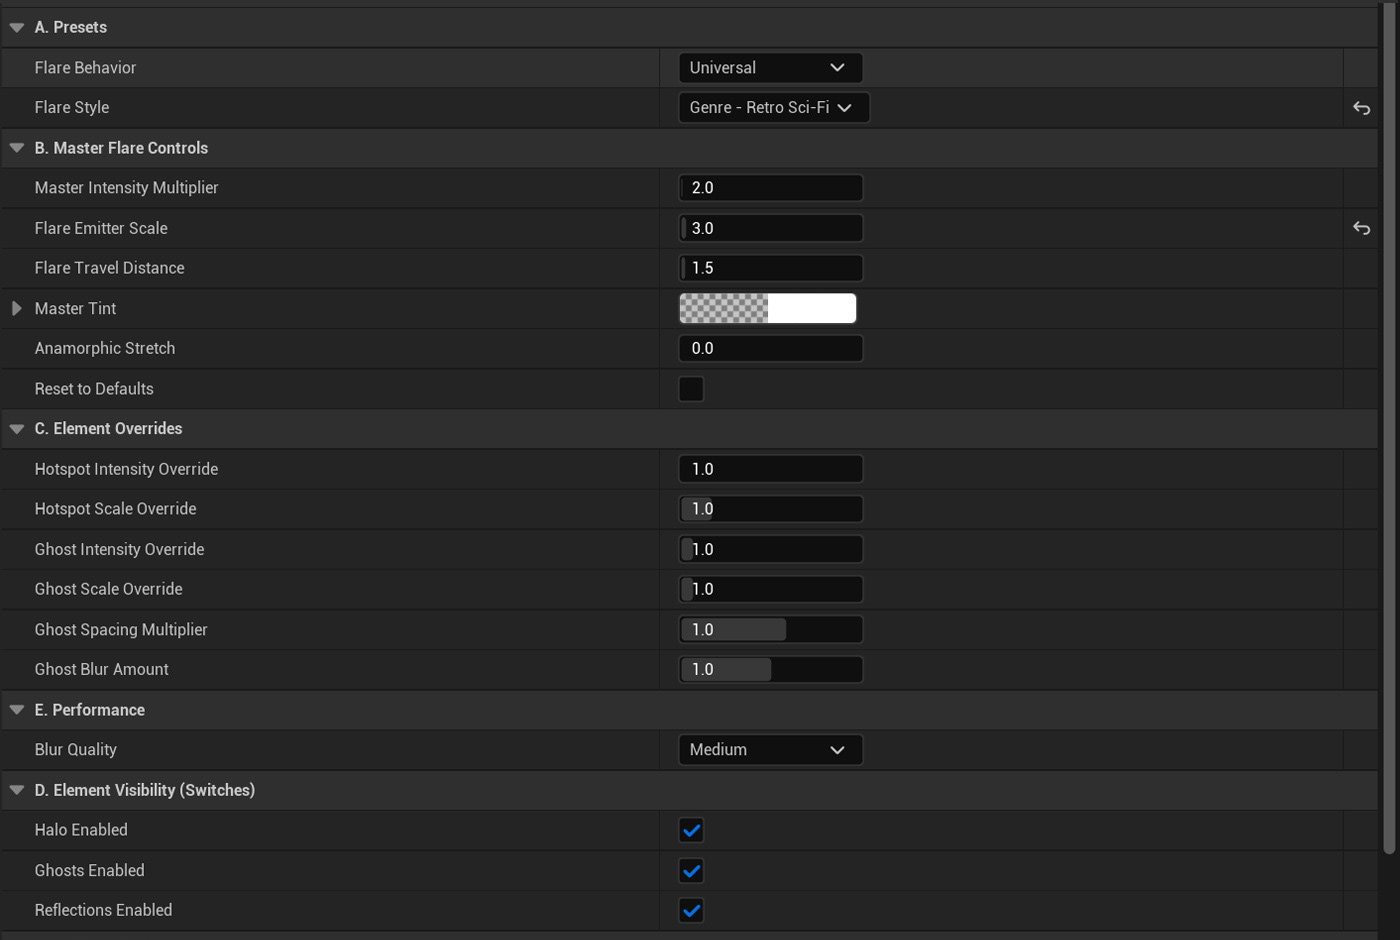
Blueprint's Details panel showing the global lens flare parameters
A. Presets (Universal Flare):
This category is the starting point for the BP_UniversalFlare and defines its core function and visual style.
● Flare Behavior: Switches the flare's core function. Directional is for infinitely distant sources like a sun, while Universal attaches the flare to a specific point in the world, like a lamp or engine.
● Flare Style: A drop-down menu to select a pre-configured visual look for the lens flare, such as "Sahara Desert," "Modern Sci-Fi," or "Radiant Star".
B. Master Flare Controls:
These are high-level controls that affect the entire flare's appearance and are available on both the Sun Flare and Universal Flare Blueprints.
● Distance from Camera (Sun Flare Only): Adjusts the flare's position along the camera's forward axis, effectively pushing it backward or bringing it closer.
● Master Intensity Multiplier: A multiplier for the Master Intensity that is set in the material. A value of 1 uses the material's setting, while 2 makes it twice as bright.
● Flare Emitter Scale: This multiplier scales the entire particle system emitter, increasing the overall size of the flare's "container" and affecting how far elements can travel from the center. It does not scale the material textures themselves.
● Flare Travel Distance: Scales the particle emitter to control the maximum distance that flare elements (especially ghosts) can travel from the light source. Higher values create a longer, more stretched-out flare.
● Master Tint: Applies a global color tint on top of the material's existing settings.
● Anamorphic Stretch: Controls the horizontal stretch of the entire flare effect to create a cinematic look.
● Reset To Defaults: A button that resets all flare settings in the Blueprint to their default values.
C. Element Overrides
This category provides quick access to override specific visual properties from the material instance for fast adjustments.
This category provides quick access to override specific visual properties from the material instance for fast adjustments.
Hotspot
● Hotspot Intensity Override: Overrides the Hotspot Intensity from the material instance.
● Hotspot Scale Override: Overrides the Hotspot Scale from the material instance.
Ghost
● Ghost Intensity Override: Overrides the Master Ghost Intensity from the material instance.
● Ghost Scale Override: Overrides the Ghost Scale from the material instance.
● Ghost Spacing Multiplier: Multiplies the Master Spacing value for ghosts, pushing them further apart or closer together.
● Ghost Blur Amount: Directly controls the Blur Amount for ghosts.
D. Element Visibility (Switches)
This is a series of on/off switches that allow you to quickly enable or disable individual visual components of the lens flare.
This is a series of on/off switches that allow you to quickly enable or disable individual visual components of the lens flare.
● Halo Enabled
● Ghosts Enabled
● Reflections Enabled
E. Performance
These settings are used to balance the flare's visual quality against its performance cost.
These settings are used to balance the flare's visual quality against its performance cost.
● Blur Quality (Low/Medium/High/Ultra/Offline): Controls the rendering quality of dynamic blur effects in real-time.
Step 3: Customize Your Flare's Look with the Material Instance
For deep customization, you can edit the parameters within the Material Instance.
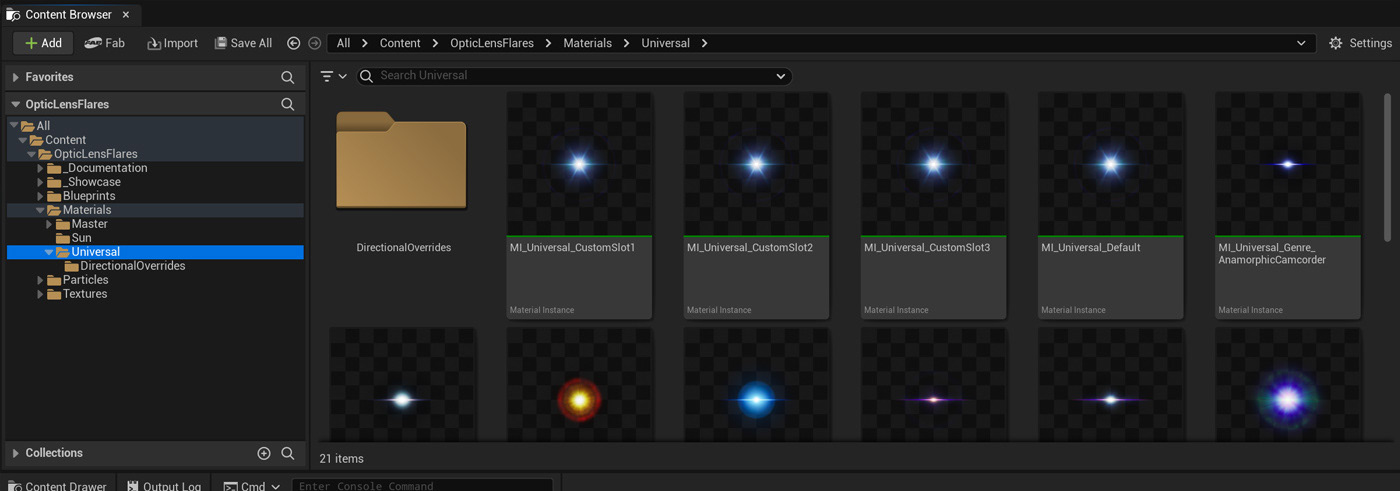
Showing the file path in the Content Browser, with the Universal folder highlighted
1. The Material Instance for this preset is MI_Universal_Genre_RetroSciFi.uasset, located in OpticFlares/Materials/Universal/.
2. Double-click the file to open the editor. It is recommended to view the flare in your level as you make changes, as the editor preview may not be fully representative.
3. Saving the Material Instance will permanently update the preset.

Part 2: Editing a Custom Preset
Both the Universal and Sun flares come with three custom preset slots for you to edit without overwriting the included styles.
Step 1: Set Up Your Scene
1. Drag a BP_UniversalFlare into your scene
2. In the Details Panel, select "MI_Universal_CustomSlot1" from the Flare Style drop-down menu.

Blueprint's Details panel with the "A. Presets" tab and the "Custom - Slot 1" preset selected
Step 2: Customize Your Flare's Look
1. The Material Instance for this preset, MI_Universal_CustomSlot1.uasset, is located in OpticFlares/Materials/Universal/
2. The editing process is the same as in Part 1. You can adjust the parameters within the Material Instance to create your desired effect.
Step 3: Save Your Changes
Any changes you make to the custom slot's Material Instance are saved to that file. This automatically updates the corresponding preset in the Blueprint drop-down while leaving the other included presets untouched.

Part 3: Editing Flare Properties
Detailed Material Instance Customization
For deep customization, you can edit the parameters within the Material Instance. The properties are organized into the following groups, giving you granular control over every part of the flare:
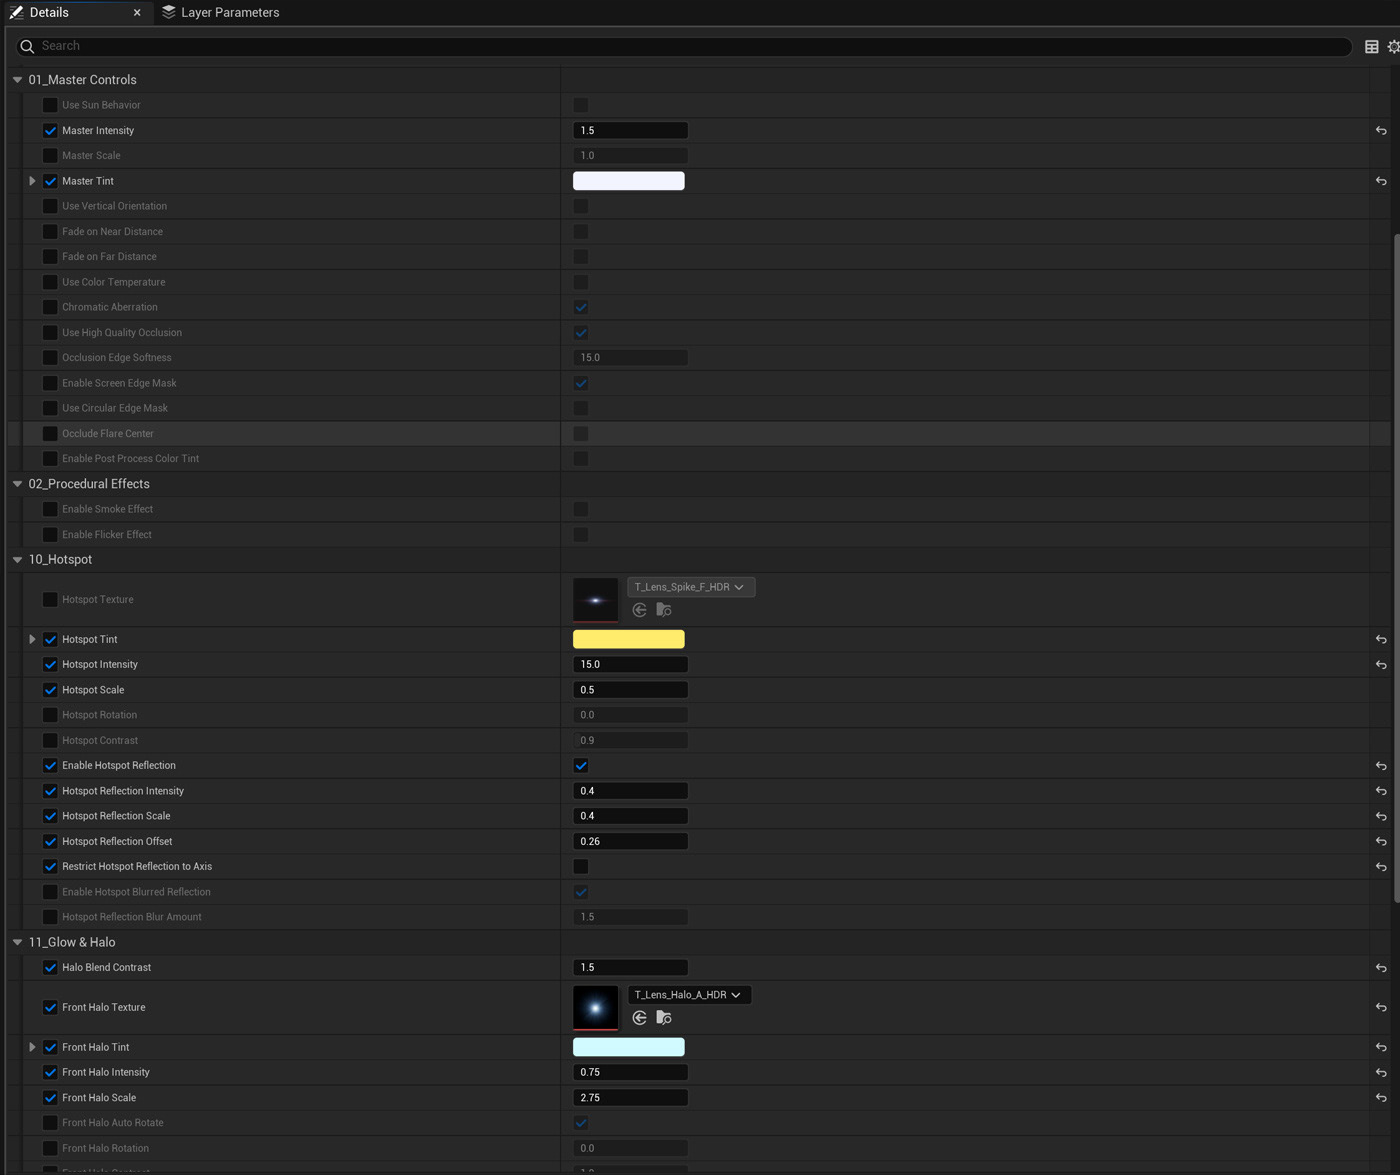
Material Instance Editor showing Master Controls and other menu's.
● Switches: This group contains on/off toggles for each flare element, allowing for quick and easy customization. You can enable or disable components like the Hotspot, Glow, Halo, Ghosts, and Haze.
● Master Controls: These are high-level parameters that affect the entire lens flare. This includes overall brightness, scale, and color tinting, as well as distance-based fading and occlusion settings.
● Procedural Effects: This group controls dynamic, animated effects that add motion and realism. You can enable and adjust a procedural smoke effect or a flicker effect to simulate light source instability.
● Hotspot: This contains all controls for the central light source element. You can change its texture, color, intensity, scale, and even add reflections.
● Glow & Halo: This group manages the soft glow and the distinct halo that surrounds the hotspot. It provides separate controls for the halo's appearance when viewed head-on versus from an angle.
● Star & Spikes: This section controls the starburst and radiating spike effects. You can adjust their textures, scale, intensity, and add effects like pulsation or reflections.
● Iris: This group controls the geometric iris shape, which mimics a camera's aperture. You can change its texture, scale, color, and add a secondary detail texture for more complex looks.
● Rings: This contains controls for the concentric ring reflections within the flare. Similar to the Iris, you can adjust the rings' texture, scale, intensity, and apply detail textures.
● Ghosts: This extensive group controls the series of off-axis reflections that appear opposite the hotspot. It includes master controls for blur, spacing, and tint, as well as individual controls for up to 10 distinct ghost elements.
● Haze: This group controls the subtle, screen-wide atmospheric haze. You can adjust the haze's radius, opacity, and color gradient from its inner to outer edge.

Part 4: Edit Sun Flares
Sun Flare presets are located in OpticFlares/Materials/Sun/ and can be edited using the same methods.
Step 1: Set Up Your Scene
1. Drag the BP_SunFlare Blueprint into your scene. This Blueprint is designed for a single, dominant light source. It is recommended to disable or delete any other Directional Light actors in your scene to avoid conflicts.
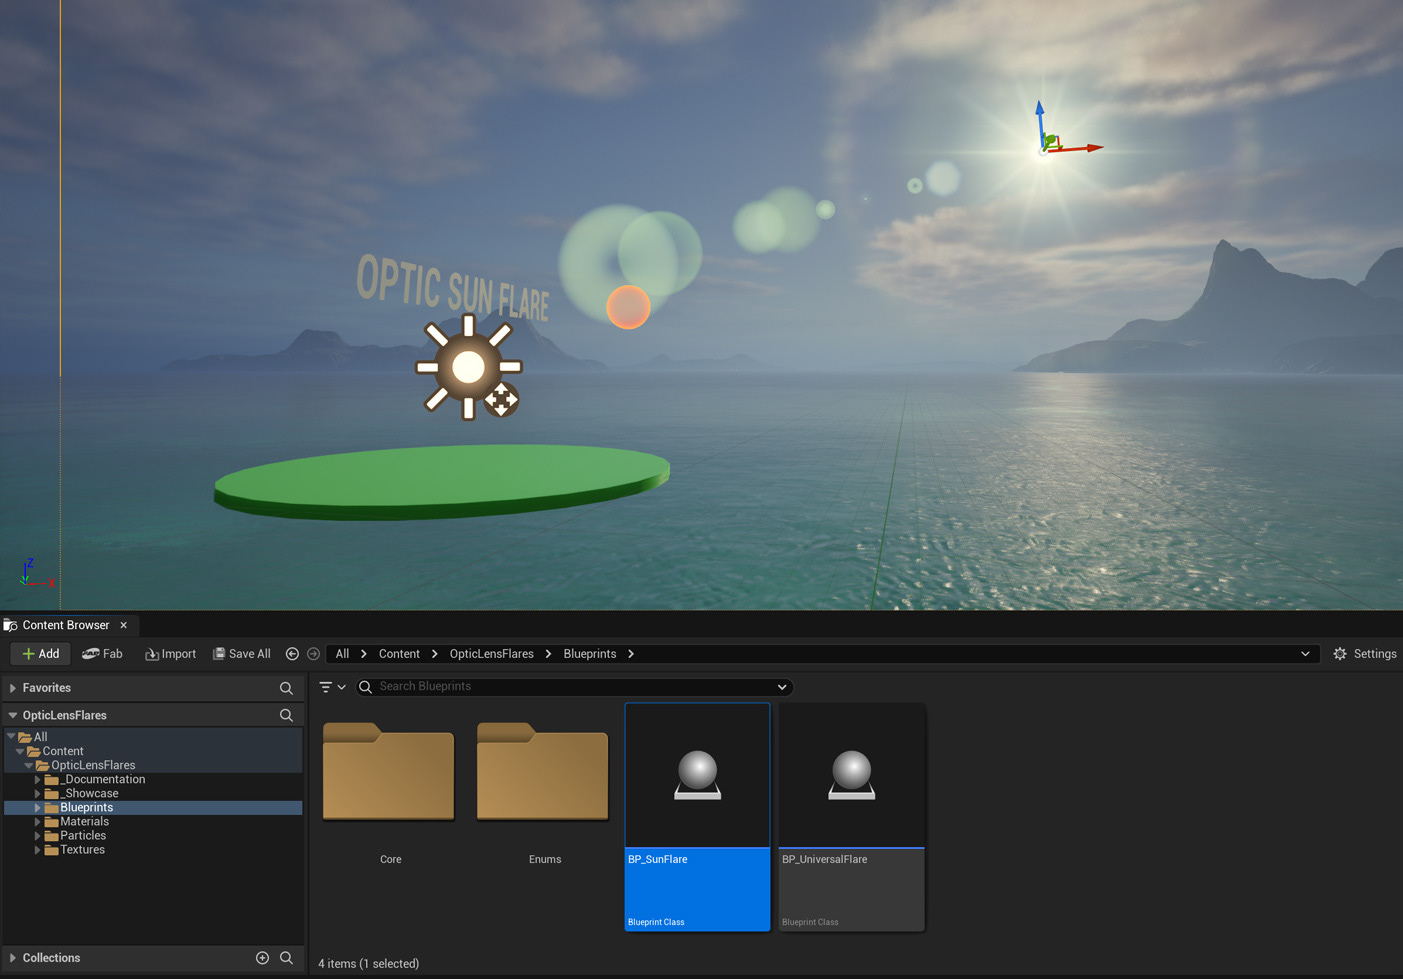
Dragging the sun flare blueprint into a level
Step 2: Global Sun Settings:
The BP_SunFlare has an exclusive category in its Details Panel: A. Sunlight & World Integration. This contains settings to control the sun's position and appearance:
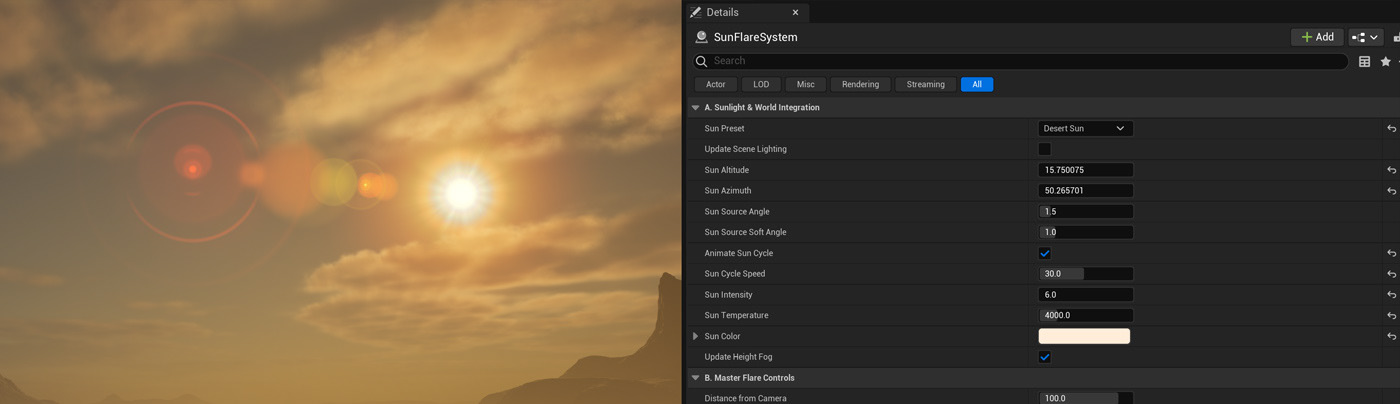
Blueprint's Details panel showing the global sun flare parameters
A. Sunlight & World Integration
● Sun Preset: A dropdown to select from pre-configured flare styles.
● Update Scene Lighting: Applies the lighting and fog settings from the selected preset to the scene's Directional Light and Height Fog. The lens flare updates automatically from the dropdown and is not affected by this button.
Light Source Properties
● Sun Altitude: Sets the vertical angle of the sun, from the horizon (0°) to the zenith (90°). This primarily controls the time of day.
● Sun Azimuth: Sets the horizontal angle of the sun, controlling its position along the horizon (e.g., east to west).
● Sun Source Angle: Sets the angular size of the sun's disk. A smaller value creates a sharp, point-like source, while a larger value simulates a wider, more diffuse source.
● Sun Source Soft Angle: Controls how soft or sharp the shadows are. A higher value creates softer shadows, while a lower value makes them sharper.
● Animate Sun Cycle: Toggles a day/night cycle animation.
● Sun Cycle Speed: Controls the speed of the animation.
World Properties
● Sun Intensity: Adjusts the intensity of the scene's directional light actor.
● Sun Temperature: Controls the color temperature of the directional light actor.
● Sun Color: A final color tint for the directional light actor.
● Update Height Fog: When checked, applying a preset will also adjust the scene's height fog for a unified look.
Step 3: Sun Cycle Animation
The Blueprint includes a setting to Animate Sun Cycle. When playing the game, this feature automatically updates the directional light's position to create a sunrise-to-sunset transition.
Important Note: One key difference with Sun Flares is that each preset uses two materials, an _Occluded and a _NonOccluded version (e.g., MI_Sun_DesertSun_Occluded.uasset and MI_Sun_DesertSun_NonOccluded.uasset). The system uses the _Occluded material when the flare is blocked by objects in the scene.
Recommendation: To fully understand how all these settings work, we highly recommend examining the existing preset materials to see how they were made.

Thank you for your support in purchasing Optic Lens Flares! We hope this guide helps you create stunning cinematic looks for your projects. If you haven't yet, we invite you to check out Optic Lens Flares and see how it can enhance your next creation.